Dokončili jste úpravu svého Reelu. Vypadal skvěle. Nahráli jste ho – a buď vám text ořízl panel s popiskem, náhledová fotka vypadá v mřížce divně, nebo je celé video rozmazanější, než jste čekali. Nebyl to problém s obsahem, ale s technickými parametry.
Tento průvodce vám poskytne všechna potřebná čísla, vysvětlí, proč nová mřížka profilu mění pravidla pro úvodní fotky, a ukáže vám nastavení exportu, které přežije kompresi Instagramu bez ztráty ostrosti.
Rychlá odpověď
| Parametr | Hodnota |
|---|---|
| Rozlišení videa | 1080 × 1920 px |
| Poměr stran | 9:16 |
| Velikost úvodní fotky (Cover) | 420 × 654 px (oficiální minimum) – pro nejlepší kvalitu nahrajte 1080 × 1920 px |
| Max. velikost souboru | 4 GB |
| Max. délka (nahrání souboru) | 20 min (nahrávání v aplikaci: až 3 min) |
| Doporučená délka | Pod 90 sekund pro lepší dosah (discovery) |
| Formát | MP4 (preferováno) nebo MOV |
| Snímková frekvence (FPS) | 30 FPS |
| Kodek | H.264 |
Rozměry videa
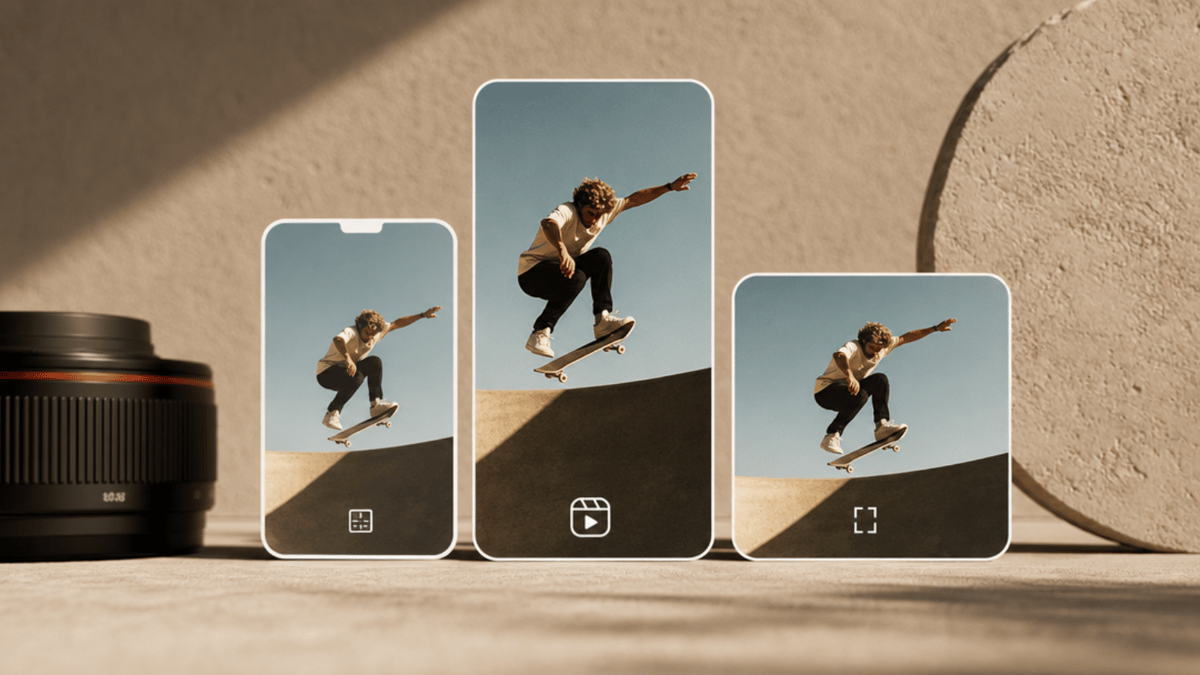
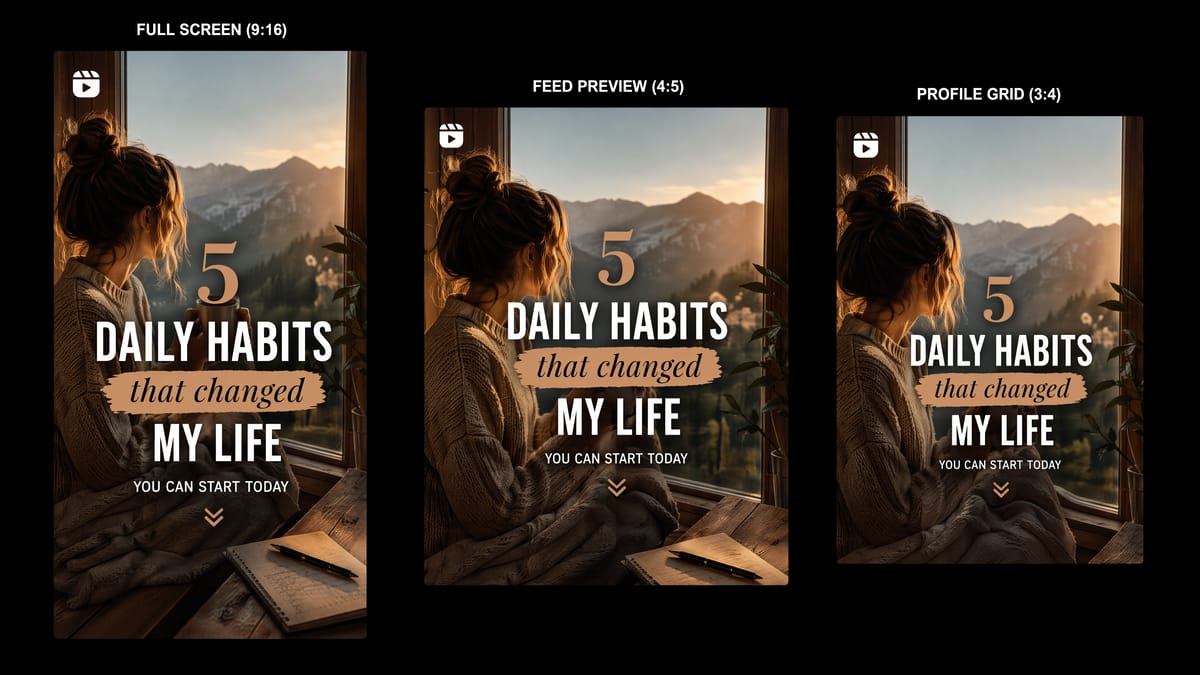
Správná velikost Instagram Reel je 1080 × 1920 pixelů s poměrem stran 9:16. To je stejný vertikální formát Full HD, jaký používají TikTok a YouTube Shorts – v režimu na výšku vyplní každý pixel obrazovky telefonu.
Natáčení a exportování v poměru 9:16 hned od začátku je jedinou cestou k zobrazení na celou obrazovku. Pokud má vaše zdrojové video jiný poměr, stane se následující:
16:9 (horizontální): Instagram přidá černé pruhy nahoru a dolů. Video se zmenší na úzký pruh uprostřed obrazovky.
4:5 (portrét ve feedu): Technicky akceptováno, ale Reels se v náhledu kanálu oříznou na 4:5. Přijdete o horní a dolní část záběru.
1:1 (čtverec): Při zobrazení na celou obrazovku bude video oříznuto po stranách.
Při tvorbě Reels vždy začínejte s formátem 9:16. Ořezávání ze širšího formátu vždy znamená, že o něco přijdete.
Jedna věc, kterou většina návodů opomíjí: V roce 2025 Instagram definitivně zavedl novou vertikální mřížku profilu. Váš profil nyní zobrazuje náhledy veškerého obsahu v poměru 3:4 (1080 × 1440 px) místo starého čtverce 1:1. To mění způsob, jakým vypadá úvodní fotka vašeho Reelu v mřížce – více o tom níže.
Úvodní fotka a miniatura
Oficiální doporučená velikost úvodní fotky (coveru) je 420 × 654 px (poměr 1:1,55). V praxi ale nahrávání v rozlišení 1080 × 1920 px (9:16) přináší ostřejší výsledky – Instagram ji automaticky zmenší a vyšší rozlišení vypadá na moderních obrazovkách lépe. Jako pracovní velikost používejte 1080 × 1920 px; rozměr 420 × 654 px berte jako absolutní minimum.
Váš cover se zobrazuje na několika místech, přičemž každé má jiný ořez:
Záložka Reels na vašem profilu: zobrazuje celý snímek 9:16 – použijte 1080 × 1920 px
Hlavní mřížka profilu: ořízne se na 3:4 (od aktualizace mřížky v lednu 2025)
Miniatura v hlavním feedu (když se váš Reel objeví mezi příspěvky): zobrazuje se v rozměru 1010 × 1010 px (1:1) – držte hlavní objekt uprostřed, aby i tento ořez fungoval
Na tomhle záleží. Úvodní fotka, která vypadá skvěle na celou výšku, může mít v mřížce profilu napůl oříznutý obličej.
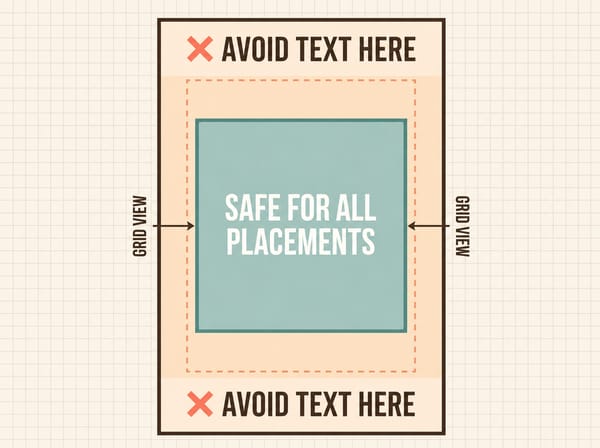
Praktické pravidlo: Navrhujte úvodní fotku v rozměru 1080 × 1920, ale všechny důležité prvky – tváře, text, produkt – umístěte do centrálního čtverce 1080 × 1080. Tato oblast přežije každý ořez, který na ni Instagram aplikuje. Pokud má váš obrázek pro úvodní fotku nízké rozlišení, nejprve ho zvětšete (upscale) před nahráním – rozmazaný cover se po zveřejnění opravuje jen těžko.
U textu na úvodní fotce se vyhněte horním a dolním 480 pixelům. Tento prostor se při zobrazení v mřížce 3:4 odřízne.
Úvodní fotku můžete nastavit dvěma způsoby:
Vyberte konkrétní snímek přímo z videa během nahrávání.
Nahrajte vlastní obrázek z galerie telefonu (klepněte na „Upravit úvodní fotku“ na obrazovce sdílení).
Bezpečné zóny (Safe Zones)
Prvky uživatelského rozhraní Instagramu (tlačítka, texty) překrývají vaše video. Pokud pod ně umístíte důležitý obsah, nebude vidět.
Tři zóny, kterým je třeba se vyhnout:
| Zóna | Pixely k vynechání | Co ji překrývá |
|---|---|---|
| Spodní část | 450 px | Popisek, uživatelské jméno, název audia |
| Horní část | 220 px | Profilová fotka, indikátor „sleduji“ |
| Levá / Pravá strana | 35 px na každé straně | Boční okraje |
Tlačítka interakce na pravé straně (lajk, komentář, sdílení) se nacházejí v zóně 35 px, ale zasahují více dovnitř – proto držte jakýkoli kritický text nebo výzvy k akci (CTA) zcela mimo pravý okraj.
Nejjednodušší pravidlo: veškerý text a klíčové vizuály držte ve středu záběru, mimo horních 220 px a spodních 450 px. Takový obsah zůstane viditelný v režimu celé obrazovky, v náhledu feedu (4:5) i v mřížce (3:4), aniž by byl oříznut.
Váš Reel se také zobrazuje odlišně podle toho, kde na něj divák narazí:
Záložka Reels / Průzkumník / klepnutí na celou obrazovku: plný formát 9:16
Skrolování feedem: oříznuto na 4:5 – horní a dolní část záběru se odřízne
Mřížka profilu: oříznuto na 3:4 (nová mřížka) nebo 1:1 (stará mřížka, kterou někteří stále mají)
Navrhujte pro 9:16 s ohledem na bezpečné zóny a váš obsah bude vypadat dobře všude.
Technické specifikace souboru
| Nastavení | Hodnota |
|---|---|
| Formát | MP4 (preferováno), MOV |
| Max. velikost souboru | 4 GB |
| Kodek | H.264 (vyhněte se H.265/HEVC – způsobuje chyby při nahrávání) |
| Audio kodek | AAC |
| Min. délka | 3 sekundy |
Instagram přijímá soubory až do 4 GB, ale nahrávání takto velkých souborů málokdy pomůže. Instagram každé nahrané video znovu překóduje. Čistý, dobře zkomprimovaný zdrojový soubor přežije tento proces lépe než obrovský surový export.
Délka videa
Délka Instagram Reels v roce 2026 může být matoucí, protože limity se liší podle toho, jak Reel vytváříte.
Nahrávání v aplikaci: Většina účtů může nahrávat přímo v kameře Instagramu až 3 minuty. Některé účty mají stále limit 90 sekund – jde o postupné zavádění funkcí, nikoli o chybu.
Nahrání z galerie (Camera Roll): Jako Reel lze nahrát jakékoli video o délce až 20 minut – toto je potvrzený oficiální limit.
Co je skutečně důležité pro dosah: Limity délky jsou technickým stropem, nikoli doporučením pro úspěch. Algoritmus Instagramu posílá kratší Reels více lidem. Instagram přímo uvádí: „Videa delší než 3 minuty nebudou doporučována novému publiku.“ Pokud je vaším cílem organický zásah, ideální délka je pod 90 sekund.
Pokud váš obsah skutečně vyžaduje více času – například tutoriál nebo návod – máte k dispozici až 20 minut. Ale pamatujte, že každá sekunda si musí zasloužit divákovu pozornost.
Nastavení exportu
Rozmazané Reels téměř nikdy nezpůsobují špatné rozměry. Vznikají tím, že komprese Instagramu narazí na soubor, který byl během úpravy už jednou nebo dvakrát zkomprimován.
Při každém exportu videa kodér zahazuje data. Pokud exportujete znovu z již exportovaného souboru, komprimujete už zkomprimované. Ve chvíli, kdy na to Instagram aplikuje svůj vlastní proces, detaily jsou pryč.
Exportujte pouze jednou z nejlepšího zdrojového souboru, který máte, s tímto nastavením:
| Nastavení | Doporučená hodnota |
|---|---|
| Formát | MP4 |
| Kodek | H.264 |
| Rozlišení | 1080 × 1920 px |
| Snímková frekvence | 30 FPS |
| Datový tok (Bitrate) | 3 500–5 000 kbps |
| Audio | AAC |
Proč 30 FPS místo 60 FPS? Instagram komprimuje soubory s 60 FPS agresivněji než ty s 30 FPS. U většiny obsahu – mluvící hlava, lifestyle, produkty – výsledek po překódování Instagramem vypadá paradoxně lépe při 30 FPS. 60 FPS má smysl u rychlých sportů nebo akčních záběrů, kde záleží na plynulosti pohybu.
Proč H.264 místo H.265? H.265 (HEVC) sice vytváří menší soubory při stejné kvalitě, ale na Instagramu často způsobuje chyby při nahrávání a selhání zpracování. H.264 je sázka na jistotu.
Ještě jedno nastavení v aplikaci Instagram stojí za kontrolu: jděte na svůj profil → menu → Využití dat a kvalita médií (v sekci Vaše aplikace a média) → zapněte Nahrávat v nejvyšší kvalitě. Tím řeknete Instagramu, aby upřednostnil ostrost před rychlostí nahrávání.
Klíčem je začít s kvalitním zdrojem. Pokud tvoříte video z obrázků, můžete je animovat přímo do formátu 1080×1920 připraveného pro Reels. Chcete začít úplně od nuly? Nástroj text-to-video krok se změnou velikosti úplně přeskočí.
Velikosti pro více platforem
TikTok i YouTube Shorts používají stejný formát 9:16 (1080 × 1920 px). Pokud publikujete na všech třech, stačí vám jeden vertikální master.
Instagram má ze všech tří nejpřísnější bezpečné zóny. Obsah, který vypadá dobře na Instagramu, bude vypadat v pohodě i na TikToku a Shorts. Navrhujte primárně pro Instagram a distribuce na další platformy bude hračka.
Jedna výjimka: Umístění tlačítek TikToku se mírně liší od Instagramu. Sloupec tlačítek na pravé straně je zhruba ve stejné výšce, ale popisky na TikToku překrývají spodní část záběru výrazněji. Pokud přidáváte text k dolnímu okraji, raději si ho na obou platformách předem zkontrolujte.
Pokud k obsahu svých Reels potřebujete i statický banner, můžete si nechat vytvořit Instagram banner se správnými rozměry automaticky.
Klíčové body
Video: 1080 × 1920 px, 9:16, MP4, H.264, 30 FPS
Úvodní fotka: 1080 × 1920 px – klíčové prvky držte v centrální oblasti 1080 × 1080, aby přežily ořez mřížky 3:4
Bezpečné zóny: Spodních 20 %, pravých 10 %, horních 10 % – do těchto míst nedávejte text ani obličeje
Délka: Pod 90 sekund pro nové publikum; až 20 minut pro věrné sledující (potvrzeno Instagramem)
Jak na ostřejší Reels: Exportujte pouze jednou ze zdroje, použijte H.264 a bitrate 3 500–5 000 kbps – formát je méně důležitý než omezení počtu kompresí