Your LinkedIn photo is the first thing a recruiter sees before reading a single word of your profile. A blurry selfie or an outdated headshot from 2019 signals the wrong thing before you've had a chance to say anything.
The old solution was booking a photographer, clearing half a day, and spending $200–$500. The new one takes 30 seconds.
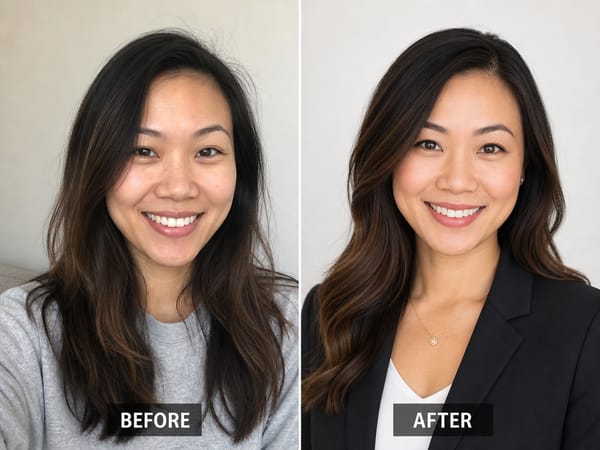
AI headshot generators have matured significantly in 2025–2026. The best tools now produce photos that are genuinely hard to distinguish from studio photography — sharp lighting, clean backgrounds, natural skin texture.
This guide walks you through the exact process, including the one step most people skip that determines whether your results look professional or obviously AI-generated.
Why AI headshots look fake
Before the steps, a quick explanation of why some AI headshots look great and others look like a video game character wearing your face.
The output is only as good as your input. Every AI headshot tool — no matter how advanced — is reconstructing your face from the photos you give it. Feed it a dark, filtered selfie taken in a crowded bar, and the AI has to fill in a lot of gaps. It guesses. And the guesses show.
The other common failure is over-smoothing. Cheap tools iron out every pore and shadow until you look like a polished marble statue. That might sound appealing until you compare it to a real photo of yourself. Recruiters notice. Clients notice. The goal isn't perfection — it's a professional version of you.
Keep both of these in mind as you work through the steps below.
Step 1 — The source photo
This is the most important step. Most guides rush past it. Don't.
Use your rear camera, not the selfie camera. Front-facing cameras have wide-angle lenses that distort facial proportions — your nose appears larger, your face rounder. The rear camera produces accurate proportions. Set a 3-second timer and prop your phone against something stable.
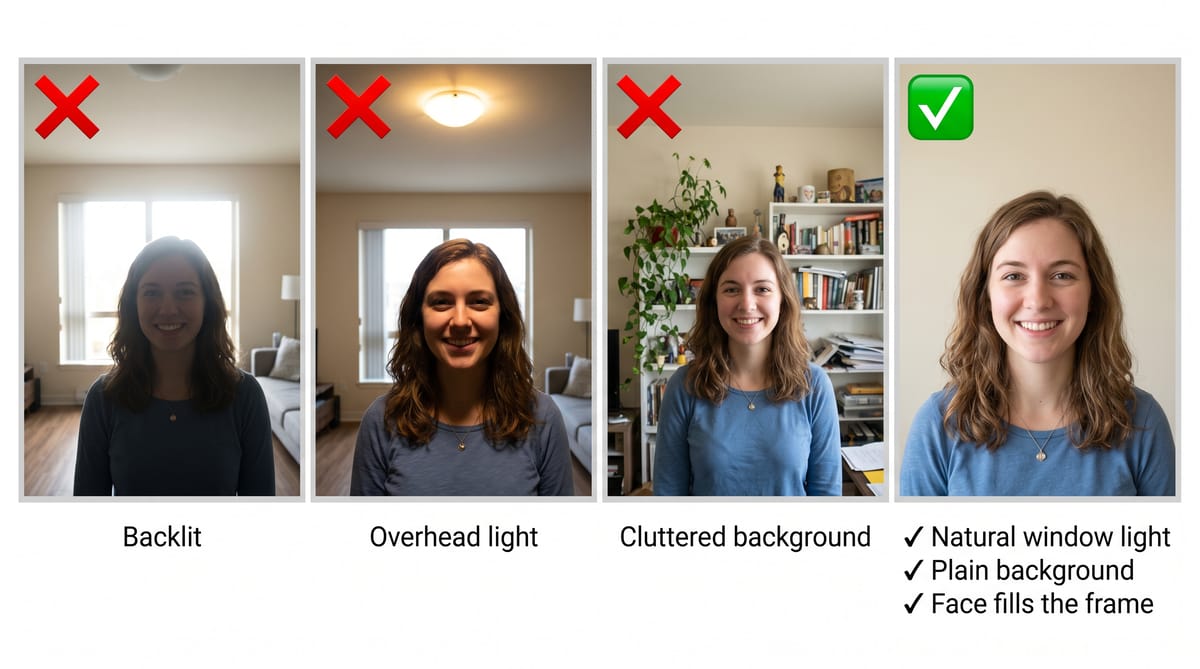
Find a window. Natural light from a window is the single best lighting source available to you at home. Position yourself facing the window — not with the window behind you (that creates silhouettes) and not directly below a ceiling light (that creates harsh shadows under your eyes and nose). Overcast daylight works perfectly; direct sunlight can be too harsh.
Use a plain background. A white or light gray wall is ideal. The AI needs to focus on your face. A cluttered room, a bookshelf, or a patterned wall distracts the model and can bleed into the output.
Keep it simple. No hats, no sunglasses, no heavy filters applied in-app before uploading. No group photos — ever. If another person appears in your photo, the AI may blend their features into your output.
Frame yourself from the shoulders up, with your face filling most of the frame. Look directly at the camera. A neutral or slight smile works well for professional contexts.
A front-facing photo is required. The AI needs a clear, straight-on view of your face to work from. If you also have a side-profile shot — even a casual 45-degree angle — upload it alongside your front photo. It gives the model more to work with and tends to improve likeness accuracy.
One strong front-facing photo in good light gets you a solid result. Adding a side angle makes it better.
Step 2 — Choose your tool
AI headshot generators fall into two broad categories.
Model-training tools ask you to upload 10–20 photos, then spend several minutes (sometimes longer) training a custom AI model on your face. The advantage is potentially stronger face consistency across many outputs. The tradeoff is time and the friction of sourcing that many usable photos.
Single-photo tools generate results from one image, often in under a minute. They're faster and simpler, and the best ones produce results that are indistinguishable from the model-training approach.
For most people — especially those who just need a solid LinkedIn headshot or a few professional portraits — a single-photo tool is the right choice. OmniPhoto delivers results in under 30 seconds, with a range of style options covering everything from corporate headshots to life portraits. A few things worth knowing before you commit to any tool:
Face consistency. OmniPhoto's model is specifically optimized to preserve your actual facial features across every output — same face structure, same eye color, same proportions. This is where a lot of tools fall short. Cheap generators produce a professional-looking face, just not yours.
No body or detail errors. A common AI artifact is a collar that doesn't connect, a lapel that warps, or ears that look subtly wrong. OmniPhoto's generation handles clothing and facial details cleanly — professional attire rendered accurately, not approximated.
Attire and style. Default styles use professional clothing appropriate for each use case — suited looks for corporate contexts, smart-casual for creative industries. If the defaults don't match your brand, styles are customizable.
Resolution. Outputs are delivered at 1080p — sharp and ready for LinkedIn, email signatures, and website profiles. If you need higher resolution for print or large-format use, OmniPhoto's built-in photo upscaler can take any headshot up to 2K, 4K, or 8K without regenerating from scratch.
Pricing and privacy. Plans start at $19.90/month with no hidden upsells — the price you see is what you pay. On the privacy side: photos are processed over encrypted connections and never used to train AI models. Generated headshots are stored for 30 days on free accounts and 180 days for subscribers — download anything you want to keep before then. New users get free credits to test it before committing.
Step 3 — Pick your style
Style selection matters more than most people realize. A headshot that works for a creative director looks wrong on a real estate listing. A few guidelines:
LinkedIn and corporate profiles: Go with a clean, neutral background — light gray or white. Dark blazer or button-down for men; blazer or professional top for women. The lighting should feel controlled, not dramatic. You want "competent and approachable," not "CEO of a cyberpunk startup."
Real estate and client-facing roles: Slightly warmer lighting and a more open expression work better here. You're selling trust and approachability, not authority.
Doctors, lawyers, and professional directories: Straightforward and authoritative. Neutral background, formal attire, direct eye contact.
Teams and company pages: Consistency matters more than individual preference. When everyone on the About Us page has different backgrounds, lighting styles, and color temperatures, it looks like the company was assembled from different eras. Use the same style settings across your whole team.
OmniPhoto covers all of these scenarios — individual professionals, client-facing roles, and a team headshot generator built for bulk uploads across distributed teams.
Step 4 — Review your results
Before downloading and uploading to LinkedIn, do a quick check:
Does it look like you? Not a younger, smoother, idealized version — you. If the face structure has shifted noticeably, or your eye color is wrong, something went wrong in the generation. Retake your source photo with better lighting and try again.
Is the lighting consistent? The light should appear to come from one direction and match the background. A face lit from the left with a background lit from the right is a classic AI tell.
Are there any artifacts? Check the ears, collar, and hairline — these are where AI tools most commonly slip. Asymmetric ears, a collar that doesn't connect, hair that dissolves into the background. A well-built generator handles all of these cleanly. If you're seeing obvious errors in these areas, the tool itself is the problem, not your source photo.
Would you recognize yourself in person? This is the real test. If you use a headshot that makes you look 10 years younger or 20 pounds lighter, the gap between your photo and your actual appearance will be the first thing anyone notices when you meet.
If the results aren't right, the fix is almost always the source photo — more light, cleaner background, better framing. Regenerate with an improved input before changing tools.
Mistakes that ruin AI headshots
Uploading filtered photos. Instagram and Snapchat filters modify your facial geometry — they widen eyes, slim faces, smooth skin. The AI treats this as your actual appearance and generates from that distorted baseline. Always upload unfiltered, original photos.
Using a group photo as your source. Even if you crop out other people before uploading, the AI can pick up on partial features at the edges and blend them into your output. Use photos where you are the only subject.
Expecting free tools to produce professional results. Free AI headshot generators generate a generic professional-looking face, not your face. The technology that preserves actual facial identity requires compute that free tiers don't cover. If you need results you can actually use, budget $20–$40 for a paid tool.
Not checking the refund policy. Some services offer full refunds if you're unsatisfied, others offer partial refunds, and some offer none. Know this before you pay. OmniPhoto offers refunds within 3 days of subscribing if you've used fewer than 50 credits.
Choosing a photo that doesn't represent how you actually look. A headshot optimized for the way you looked five years ago, or one where the AI has quietly made you look younger than you are, creates an awkward gap when you meet people in person. Keep it honest.
Beyond LinkedIn: other use cases
The same process works for any professional context where a photo creates a first impression.
Teams: Instead of coordinating a photoshoot across a distributed team — different cities, different schedules — each person takes a source photo at home and runs it through the same style settings. The output is a visually consistent team page without anyone traveling anywhere.
Real estate agents: Listings, business cards, and agency directories all require professional headshots. AI generates them in seconds at a fraction of the cost of a traditional shoot.
Life portraits: The technology extends beyond professional headshots. OmniPhoto's portrait tools cover maternity photos, wedding portraits, newborn photos, and family sessions — studio-quality results from casual snapshots.
Key Takeaways
A front-facing photo is required. Add a side-profile shot if you have one — it improves face accuracy.
Your source photo determines everything. Rear camera, natural window light, plain background, no filters.
Single-photo tools are fast enough for most professional use cases in 2026 — no need to source 20 selfies.
Match your style to your context — corporate, real estate, and medical headshots each have different visual conventions.
Check likeness, artifacts, and lighting consistency before publishing. If something's off, fix the source photo first.
Know what you're paying and what happens to your photos. Transparent pricing and automatic photo deletion are non-negotiable.